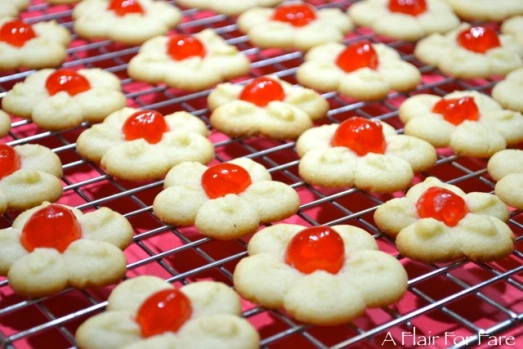
Spritz Cookies

Spritz Cookies

Spritz Cookies

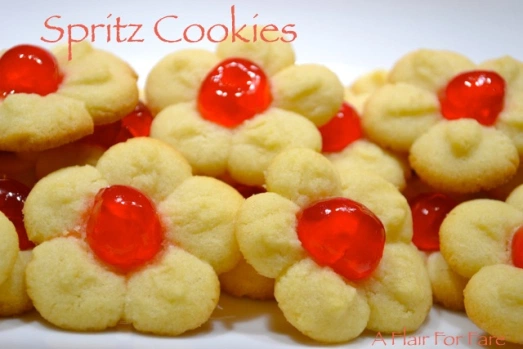
This pressed cookie is a Christmas classic. Beautifully delicate, buttery, melt in your mouth deliciousness. Use a variety of disks for an impressive display on your cookie tray.

The following recipe came with my 70’s WearEver Super Shooter cookie gun. How’s that for a blast from the past? That was a fun toy for many years but it is long gone and a traditional cookie press has taken it’s place.

Ingredients:

1 cup butter, softened to room temperature

3/4 cup sugar

3 large egg yolks

1 teaspoon vanilla

1/8 teaspoon salt

2 1/4 cups all purpose flour

Directions:

Preheat oven to 400 degrees.

Using a stand mixer, beat butter, gradually adding sugar until light and fluffy. About 5 minutes.

Add egg yolks, vanilla and salt and beat well.

Add flour in 3 additions, mixing well after each addition. Dough will be stiff.

Fill cookie press, following manufacturers directions, using desired disk.  Press onto cold, clean cookie sheet. Do not use non stick pans, parchment or a silpat; the dough will not stick.  Space cookies about 2 inches apart.  Decorate with candied fruits, nuts or sprinkles.

Bake 8 minutes or just until edges start to turn a light golden brown. Let cool on pan for several minutes, then carefully remove. Complete cooling on a wire rack.

Makes 6-7 dozen cookies.

Spritz Cookies 2

Gingerbread Cookie Bars

Gingerbread Cookie Bars

No time for cutouts? Here’s a delicious alternative that will surely satisfy your gingerbread cravings.  And even better, it’s slathered with a dreamy, orange, cream cheese frosting. These bars are moist and chewy and quite tasty on their own, but that tangy topping really makes them rock.

Gingerbread Cookie Bars

adapted from SixSistersStuff.com

Cookie Bars

  • ½ cup butter, melted
  • ¾ cup sugar
  • ¼ cup brown sugar
  • ½ teaspoon vanilla
  • ⅓ cup molasses
  • 1 egg
  • 2 teaspoons baking soda
  • 2 cups flour
  • 1 tablespoon cinnamon
  • ½ teaspoon ground ginger
  • ¼ teaspoon ground cloves
  • ¼ teaspoon nutmeg
  • ½ teaspoon salt

Orange Cream Cheese Frosting

    • 8 ounces cream cheese
    • ¼ cup butter, softened
    • 3 cups powdered sugar
    • 1 teaspoon vanilla
    • 1 teaspoon orange zest
    • 2 teaspoons freshly squeezed orange juice

Preheat oven to 350 degrees.

Spray a 9×13″ baking pan with Pam cooking spray and set aside.
Using a stand or hand mixer, cream melted butter, sugar, brown sugar, vanilla, and molasses.Add egg and beat until completely incorporated.

In a separate mixing bowl, add baking soda, flour, cinnamon, ginger, cloves, nutmeg and salt and mix until well combined. Add flour mixture to butter mixture in 3 additions. Mix well after each addition, scraping down the sides of the bowl as needed.

Press dough evenly into the bottom of prepared pan.

Bake at 350 degrees for 15 minutes. Do not over bake.  Cool completely in pan.

Cream butter and cream cheese together in a large mixing bowl. Add powdered sugar, juice, zest  and vanilla and beat until smooth and creamy.

Spread the frosting evenly over the top of the cooled Gingerbread. Garnish as desired with colored sugar, cinnamon or nutmeg. I used Wilton Royal Icing decorations.

Cut into squares. Store in a tightly covered container in the refrigerator. Remove from refrigerator 1/2 hour before serving.

Easy Chocolate Fudge

Easy Chocolate Fudge

You won’t find a quicker, easier way to make the perfect fudge than with this recipe from Eagle Brand. So creamy, with just the right amount of sweetness. I like to add walnuts for that added crunch.

Easy Chocolate Fudge

from EagleBrand.com

Ingredients

  • 3 cups (18 oz.) semi-sweet chocolate chips
  • 1 (14 oz.) can Eagle Brand Sweetened Condensed Milk
  • Dash salt
  • 1 1/2 teaspoons vanilla extract
  • 1 cup chopped walnuts (optional)

Instructions

  • Line a 9-inch pan with  aluminum foil, leaving a 1 to 2 inch overhang. Butter the foil.
  • Melt chocolate chips with sweetened condensed milk and salt in a heavy saucepan over medium low heat. Remove from heat; stir in vanilla and nuts. Spread evenly in prepared pan.
  • Chill for 1 to 2 hours or until firm. Remove from pan by lifting edges of foil; remove foil and cut into squares. Store is a tightly covered container.

Candy Cane Blossoms

Candy Cane Blossoms

This variation of the blossom cookie is made super easy with a devil’s food cake mix that’s rolled in powdered sugar for a crinkle effect.

Moist and chewy with that refreshing pop of peppermint, you’ll love this fabulously, festive holiday treat.

Candy Cane Blossoms

adapted from YourCupofCake

You will need:

1 box  Pillsbury devil’s food cake mix

2 eggs

1/3 cup vegetable oil

26 Hershey Candy Cane Kisses

1/2 cup confectioners sugar

To Make:

Unwrap candy cane kisses, place in a single layer on a plate then place in the freezer.

Preheat your oven to 350 degrees.  Line cookie sheets with a silpat or parchment paper.

Using a hand or stand mixer, combine eggs and oil with cake mix until well blended.

I use a 1 1/4 inch cookie scoop to form cookie balls. Roll balls in confectioners sugar.

Place 2 inches apart on cookie sheets and bake for 7 minutes. Cool on cookie sheet for a couple of minutes then press candy cane kiss into center of cookie.

Move to wire rack to finish cooling. Store in an air tight container. Makes 26 cookies.

Candy Cane Blossoms 2


Pumpkin Bread with Pecan Streusel Topping

Pumpkin bread2

Halloween is over and Tom Turkey will soon be on our table. It’s the time of year when we crave pumpkin spice –  in lattes, pies, muffins and breads. This lighter version from Cooking Light, is spicy and moist, without being heavy with oil. Topped with  a delightfully sweet and crunchy pecan topping, all you need is a cup of coffee or tea for the perfect afternoon snack.

Pumpkin Bread with Pecan Streusel Topping
recipe from The Best of Cooking Light

Topping Ingredients:
1/2 cup chopped pecans
2 tablespoons sugar
1- 1/2 tablespoons chilled butter cut into small pieces
1/4 teaspoon group cinnamon

Bread Ingredients:
2 cups all purpose flour
1/2 cup sugar
1 teaspoon baking soda
1 teaspoon salt
1/2 teaspoon ground cinnamon
1/2 teaspoon ground cloves
1/2 teaspoon nutmeg
1 cup canned pumpkin (not pie filling)
1/2 cup plain low-fat yogurt
1/2 cup honey
1/4 cup vegetable oil
1 teaspoon vanilla extract
2 large eggs
Cooking Spray

Directions:

Preheat oven to 350 degrees. Spray 9 x 5 inch loaf pan with a cooking spray such as Pam.

In a small mixing bowl, combine topping ingredients until crumbly. Set aside

To a large mixing bowl, add dry ingredients and whisk to combine. In a separate bowl, mix pumpkin with yogurt, honey, oil, vanilla and eggs. Make a well in the center of the dry ingredients and add wet ingredients. Stir just until well combined.

Pour batter into prepared loaf pan. Sprinkle with pecan topping.

Bake for 50-60 minutes or until a wooden toothpick inserted into the center of bread comes out clean. Cool in pan 10 minutes, then remove and complete cooling on a wire rack.  Store tightly covered for up to 3 days.

Lemon Curd Cheesecake Tart

Lemon Curd Cheesecake Tart
No Bake Lemon Curd Cheesecake Tart

I borrowed the gingersnap crust from my Cutie Pie recipe for this delightfully tangy, creamy, lemon dessert. Only the crust needs to be briefly baked to set, so I still consider this a “no bake” recipe.

Gingersnap Crust (adapted from Martha Stewart)
1 3/4 cups gingersnap crumbs (about 40 cookies, I used Archway)
1/4 cup light or dark brown sugar
1 teaspoon all purpose flour
1/2 teaspoon kosher salt
1/2 stick melted butter
9 inch tart pan with removable bottom.

Preheat the oven to 350 degrees. Add cookies to bowl of a food processor and pulse until fine crumbs.

Transfer cookie crumbs to a medium sized mixing bowl and add brown sugar, flour, melted butter,and salt. Mix well.

Press crumb mixture firmly on bottom and up the sides of the pan. Transfer tart pan to a foil lined baking sheet and into the oven. Bake for 8 minutes. Remove from oven and cool on a cooling rack while you prepare the filling.

For the Filling;
1 – 8 oz package cream cheese, softened
1 can sweetened condensed milk
1/3 cup fresh lemon juice plus zest from lemon
1 tsp vanilla
1-10.5 ounce jar lemon curd

Directions:
Beat cream cheese at medium speed until fluffy. Gradually beat in sweetened condensed milk. Add lemon juice and vanilla. Pour into cooled crust. Refrigerate at least 3 hours or until set. Once set, spread lemon curd evenly on top. Pipe or cover with fresh whipped cream and additional lemon zest, if desired and return to refrigerator until ready to serve.

For topping you will need:
1 to 1 and 1/2 cups heavy cream.
2 tablespoons granulated or powdered sugar.
1 teaspoon vanilla extract.
Whip cream stabilizer (optional)

To make the whipped topping, chill mixing bowl and whisk attachment in the freezer for 1 hour. You can use a hand mixer or stand mixer. You’ll need 1 to 1- 1/2 cups very cold heavy cream. 1 cup makes about 2 cups whipped cream. If piping the topping I suggest you increase to 1 and 1/2 cups. Avoid ultra pasteurized cream, it is harder to whip and doesn’t hold it’s shape for very long. I suggest using a stabilizer; your topping will hold up longer. Pour cream into chilled mixing bowl. Add sugar and vanilla extract. Start out a slow speed and gradually increase to high as the cream thickens. Slow down when soft peaks form; this will happen quickly- do not over beat or it will lose volume and become butter.

Lemon curd cheesecake slice2

Chicken Noodle Soup

Chicken Noodle Soup

Have a chill or feeling down? Forget that nasty canned soup. This recipe is so simple, you’ll never look back. Made with a store bought rotisserie chicken or left overs from your own roasted chicken, this soup will cure what ails you, or at least make you feel so good you’ll think it did.

Chicken Noodle Soup

Ingredients:
1-32 ounce box plus 3-14.5 ounce cans chicken broth or stock
1/2 cups chopped parsley
1- two pound rotisserie chicken
1 1/2 cups chopped carrots
1 cup thinly sliced celery
1 teaspoon italian herb seasoning
2 cups pasta noodles (I used Casarecce)
Salt and pepper to taste
1 tablespoon grape seed or olive oil

Directions:
Skin and de-bone chicken. Shred meat or chop into bite size pieces.

Heat oil over medium heat in a large soup pot. Sauté vegetables until soft. Add broth and italian seasoning and simmer for 5 minutes.

Add pasta and cook according to directions for al dente.

Add chicken and parsley, simmer 5 more minutes. Add salt and pepper to taste.

Ladle into bowls and serve.

Classic Apple Pie

apple pie close up

Classic Apple Pie

Cooler temps, falling leaves, fresh picked apples. Apple pie time. This recipe is so simple and so delicious!  Who wouldn’t love a flaky crust full of sweet apples and spicy cinnamon.  Save on time with a pre-made crust.

This 8 inch version is the perfect size for a small group.

Ingredients

7 medium-small Fuji or Honey Crisp apples

1 lemon

1/2 cup sugar

3/4 teaspoon cinnamon

1/4 teaspoon nutmeg

3 tablespoons flour

Prepared double pie crust

1 egg

8 inch pie plate or tin

Directions

Preheat oven to 350 degrees

Prepare pie crust; your favorite recipe or store bought pre-made brand. Add bottom pie dough to pie plate and trim to fit. Save trimmings.

Peel, core and thinly slice apples. Add to medium sized glass mixing bowl. Squeeze juice from lemon onto apples and toss well. Add sugar, cinnamon, nutmeg and flour. Mix well to coat.

Pour apple filling into prepared pie pan.

Apple filling

Carefully lay top pie dough over filling. Trim to fit.

pie top

Fold top dough edge under bottom dough edge and pinch to flute or crimp with fork. Cut slits or a circle of dough from the center to allow steam to escape. Beat egg and a tablespoon of water in small bowl. Brush egg wash over pie dough.

pie crimp

Optional – press dough trimmings into a ball. Roll out on lightly floured board. Cut out leaves, use paring knife to score. Arrange on top of pie and brush with egg wash.

cut leavesleaves veins

Apple Pie pre bake

Move pie plate to cookie sheet. Place in oven and bake until golden; 45-50 minutes. Watch closely and loosely cover with a sheet of aluminum foil if needed to prevent over browning.

Remove from oven and move to wire rack to cool. Serve slightly warm with vanilla ice cream. Serves 6.

Apple Pie 1Apple Pie

Jalapeño Popper Pizza

Jalapeno popper pizza

Fall is fabulous here is the Midwest, and we look forward to the cooler weather and blue sunny skies that it brings. And though summer has ended, I still have beautiful green and jalapeño peppers growing in my garden. For me, Fall and peppers can only mean one thing –  college football and homemade pizza. Ok, that’s two things, and both are autumn staples at our house.

And because we have pizza so often during football season, we like to try many different variations and this one is a new favorite.

Most anything cheesy and spicy is super delicious; put it on top of a pizza crust and rock my world.

I love the combination of sweet and hot peppers with traditional mozzarella and mexican style cheeses. Leave in most of the vein and seeds on the jalapeños for the heat that makes this pizza stand out from the everyday pizza pie. And the crispy bacon – always delectable.

So grab a cold one with a slice and cheer on your favorite team.  As for me and my house, we yell ROLL TIDE!!!

Jalapeño Popper Pizza

Ingredients:

Prepared pizza dough

4 -6 ounces softened cream cheese or a bagel cream cheese spread

1/2 cup shredded mozzarella

1/2 cup shredded pepper jack cheese

1/2 cup shredded sharp cheddar

2 jalapeño peppers, sliced into rings

1 thinly sliced small green pepper

1 thinly sliced small onion

1/3rd cup diced roasted red peppers or Peppadew peppers

4 slices diced crisp cooked bacon

1/4 cup yellow cornmeal

Sprinkle cornmeal on a pizza stone or pan. Cover with prepared pizza dough. Spread softened cream cheese evenly over dough. Add cheese and toppings in the following order:

Mozzarella, jalapeños, green pepper, onion, red pepper, shredded jack cheese, shredded cheddar, diced bacon.

Bake at 450 degrees for 12-15 minutes, until cheese is melted and crust is golden brown and puffed. If using a pizza stone, follow the manufacturer’s baking or grilling directions.

Note: Peppadew is the trademarked brand name of sweet, tangy piquanté peppers grown in the Limpopo province of South Africa

Jalepeno Popper Pizza slice

Pasta e Fagioli

Pasta e Fagioli

Summer has ended and fall weather is nipping at it’s heels. Cooler days and nights are beckoning for hearty autumn fare.

This thick, flavorful soup is all that and more. Abundantly rich with vegetables and pasta this traditional italian dish is hearty and comforting; the ideal meal for the cool nights ahead. Salad and crusty warm bread make the perfect sides. And let’s not forget a glass of your favorite vino.

Pasta e Fagioli (Pasta and Beans)

adapted from “All About Pasta & Noodles” by Irma

Ingredients:

2 tbsp extra virgin olive oil

1 medium onion, finely chopped

1 small carrot, peeled and finely chopped

1 medium celery stalk with leaves, finely chopped

2 tbsp packed finely chopped fresh parley

2 large cloves garlic, minced

One 14 oz can crushed whole tomatoes with juice

One 15 to 19 oz can cannellini, great northern or pinto beans, rinsed and drained

2 cups vegetable stock

1 cup (1 inch) pieces green beans

1 cup small frozen lima beans

2 cups packed (1inch) pieces escarole, curly endive, or swiss chard, washed and dried

1 cup elbow or shell macaroni

Salt and ground black pepper

¼ cup grated pecorino cheese (or parmesan)

Directions:

Heat olive oil over medium heat in a large soup pot. Add onion, carrots, celery and parsley and sauté until vegetables are soft, 10-15 minutes.

Add in garlic and stir for one minute. Stir in tomatoes and bring to a boil. Add beans and stock and simmer for 10 minutes. Next add escarole, endive or chard. Cover and simmer low for 5 minutes. Add pasta and salt to taste. Continue to simmer until pasta is tender, 10-15 minutes. Season with salt and pepper to your taste. Ladle into serving bowls and top with grated cheese.

Pasta e fagioli 2

Serves 8 as a first course,  4 as a main course.

Spaghetti Pie

Spaghetti Pie

This recipe by Adam Richman was recently featured on The Today Show.

A delicious baked pasta dish that can be made ahead and baked the next day. I added green pepper and italian herb seasoning for extra flavor.

Spaghetti Pie 

12 ounces spaghetti pasta noodles
1 small yellow onion, finely chopped
1 pound ground turkey or sirloin beef
1 cup tomato paste
3 large eggs
1 cup grated parmesan cheese
1 and 1⁄2 cups shredded mozzarella
1-2 tablespoons grape seed or olive oil
Salt and pepper to taste
1/4 cup diced green pepper (optional)
1/2 teaspoon Italian herb seasoning (optional)

Preheat oven to 350.
Cook spaghetti following package instructions. Reserve 1/2 cup of the cooking water. Drain pasta and set aside.

Add 1 tablespoon of grape seed or olive oil to a large skillet. Sauté onion and green pepper over medium heat until soft. Add ground turkey or beef and cook until no longer pink. Add 3/4 cup tomato paste, pasta water and italian seasoning. Simmer over low heat until sauce thickens. Add salt and pepper to taste.

Mix spaghetti, eggs, parmesan, 1 cup mozzarella and remaining 1/4 cup of tomato paste in a large bowl.

Spray a 9 inch pie plate with Pam or coat with olive oil. Spread 1/2 of the meat sauce in the bottom of the pie plate. Add spaghetti mixture, pressing down. Spread remaining sauce on top then sprinkle with 1/2 cup shredded mozzarella.

Bake for 30 to 35 minutes. Remove from the oven and let sit about 10 minutes. Use a sharp knife to slice into wedges. Top wit additional grated parmesan, if desired. Serve with a green salad and hot crusty bread. Serves 6.

Spaghetti pie 2

Easy Banana Cream Tart

Banana Creme Pie

Use store bought cookie dough and instant pudding mix for a dessert that’s fast, easy and super delicious!

Easy Banana Cream Tart

1 roll Pillsbury sugar cookie dough

1 3.4 oz box instant Jello French Vanilla or Banana Cream pudding mix

1 1/2 cups half and half

1/4 cup skim, 1 or 2% milk

2 medium bananas

1- 8 oz container heavy whipping cream (*see note)

1 tablespoon sugar

1 teaspoon vanilla

1/4 cup toasted almond slivers (optional)

Whipping cream stabilizer (optional)

8 or 9 inch tart pan with removable bottom

Form cookie dough into a ball, then press into a disc. Roll out into an 11 inch circle, carefully line tart pan with cookie dough. Press dough up the side of the pan, trim excess and discard. Place tart pan on a cookie sheet and move to refrigerator to keep cold while oven preheats. Tip- dough is easiest to work with if kept cold. Roll out on a sheet of wax paper. Put tart pan upside down on center of dough circle, pick up wax paper by edges, then flip over.

Preheat oven to 350 degrees.

In a small mixing bowl, add half and half, milk and pudding mix. Beat with a hand mixer on medium speed about 5 minutes or until set. Cover and refrigerate.

Move tart pan on cookie sheet to oven. Bake 10 minutes, remove from oven and prick with a fork to let steam escape dough. Return to oven and bake 4 minutes, dough will be puffy. Prick again and use bottom of a small measuring cup to press down center of dough. Return to oven and bake 4-6 minutes until edges are very lightly brown. Remove from oven, press center down again, if needed. Move tart pan to wire rack to cool.

When cookie dough is completely cooled, it is ready to fill. Cover bottom of crust with 2 sliced bananas. Top with pudding and spread evenly to cover. Return to refrigerator while you make the whipped cream.

For the whipped cream:

Pour 1 cup chilled heavy whipping cream to the bowl of an electric mixer fitted with a whisk attachment. (for best results, chill the bowl and the beater before using). Add 1 tablespoon sugar. I also like to use a whipping cream stabilizer, which helps keep the whip cream stiff with out separating. I use a product called “Whip it” by Dr. Oetker, but this is totally optional. Start on low and gradually increase speed to medium high. (8 on a KitchenAid stand mixer) The cream will start to thicken and soft peaks will form. Continue until the cream stands in stiff, sharp peaks. This only takes a few minutes; watch the cream closely and do not over whip or you might end up with butter.   Add whipped cream to a piping bag with decorative tip and pipe decorative swirls onto the tart as you wish. I used Wilton large tip 6B. *Note: If you don’t want to pipe the cream and prefer just to cover the top of the tart with it, increase the amount of cream to 1 and 1/2 cups and add another tablespoon of sugar.

For the almonds, warm a small non-stick pan over low heat. Add almonds and toast for about 4 minutes stirring often. Watch closely so not to burn. Remove from heat and cool.

Remove tart from refrigerator and top with whipped cream and almond slivers, if desired. Cut and serve. Store covered in the refrigerator.

Banana creme pie 2

Zucchini Banana-Nut Bread

Zucchini Banana Bread

It’s the last hurrah for zucchini from my garden so I’ve paired it up with sweet, ripe bananas for another fabulous variation on this moist and delicious snack bread.

Zucchini Banana-Nut Bread

adapted from recipe by Averie Cooks

You will need:

  • 1 large egg
  • 1/2 cup light brown sugar, packed
  • 1/3 cup applesauce
  • 1/4 cup granulated sugar
  • 1/4 cup  sour cream
  • 2 teaspoons vanilla extract
  • 1 cup all-purpose flour
  • 1/2  teaspoon baking powder
  • 1/2  teaspoon baking soda
  • 1 1/2 teaspoons cinnamon
  • pinch salt
  • 1 cup grated zucchini (about 1 large or 2 small)
  • 1 cup mashed ripe bananas (about 2 medium-large bananas)
  • 1/2  cup chopped toasted walnut

Preheat oven to 350F. Spray one 9×5-inch loaf pan or two 8x4x2 inch loaf pans with Pam for baking; set aside.

Toast walnuts in a dry sauté pan over low heat. Stir often 4-5 minutes, being careful not to burn.

Grate zucchini, place in colander and squeeze out most of the liquid.

Add first 6 ingredients to a large mixing bowl. Whisk well to combine.

Next, add flour, baking powder, cinnamon, soda and salt. Carefully fold or stir just until combined.

Fold in mashed bananas, zucchini and toasted walnuts.

Pour batter into prepared pans.

Bake for 40- 50 minutes for 8×4 pans; 50-60 minutes for 9×5 pan. Baking times always vary due to differences in moisture content of the zucchini and bananas and accuracy of oven temperature so watch your bread and check for doneness.

Cool in pans for 10-15 minutes, then remove from pans and finish cooling on a wire rack. Bread is best if eaten in a couple of days. Save a loaf for later by wrapping in cellophane, then foil and freeze. Thaw and warm slices in the microwave.

DSC_0563

Zucchini Cranberry-Nut Muffins

Zucchini Cranberry- Nut Muffins

This year is the first year I have planted zucchini; I really don’t have room in my garden but I found a spot and plopped in one plant. It grew quickly with all of the rain that we have had and sprouted many yellow flowers. After watching and waiting I was pleasantly surprised to find a beautiful bright green squash had been born – and it grew so quickly! I decided it was time to pluck this beauty before it got too big. Now I pondered, just what to do with just one zucchini? Not enough for a casserole or a quiche. It must be meant to be a muffin. And so it was. These moist, tasty gems are great for snacking, for breakfast or as an accompaniment to dinner.

Zucchini Cranberry-Nut Muffins

Makes 12

1 egg
1/2 cup applesauce
3/4 cups sugar
1 large or 2 small zucchini grated and well drained (1 cup)
1 teaspoon vanilla
1 cup sifted all purpose flour
1/4 teaspoon baking powder
1 teaspoon baking soda
1 1/2 teaspoons ground cinnamon
1/2 teaspoons salt
1/2 cup dried cranberries
1/2 cup chopped walnuts

Beat egg lightly in a large bowl. Stir in applesauce, sugar, zucchini and vanilla. In a separate bowl, sift flour, baking powder, baking soda, cinnamon and salt. Stir into egg mixture until well blended; stir in cranberries and nuts. Spray each cup of a 12 cup muffin pan with Pam. Use a standard size ice cream scoop to fill each cup 3/4 full. Bake at 350 degrees for 15-20 minutes, using a toothpick to test for doneness. Cool in pan for 5 minutes, then turnout onto a wire rack to finish cooling. 11700551_10204390571064012_4335858958550328781_oZuc muf 2

Creamy Summer Pasta Salad

Creamy Summer Pasta Salad blog

What are three of my favorite pastimes? Summertime, grilling time, pasta salad time. This creamy pasta salad is reminiscent of that old time classic macaroni salad, with the flavors kicked up. Great with ribs, chicken, burgers or fish.

Creamy Summer Pasta Salad

adapted from Barefeet in the Kitchen

Yield: 6 servings

For the salad you will need:

8 ounces Tubetti or any short tube pasta
1 cup broccoli florets cut into very small pieces
1/2 cup diced cucumber
1/2 cup small diced red pepper
1/2 cup sliced black olives
1/4 cup very thinly sliced green onion or chopped red onion

 For the Dressing you will need:

1/2 cup light real mayonnaise
2 teaspoons white wine or champagne vinegar
1/2 teaspoon kosher salt
1/2 teaspoon freshly ground black pepper
1/2 teaspoon sugar
1 teaspoon Penzeys Fox Point Seasoning (optional)

This recipe only yields 6 servings, so if you are feeding a big crowd you will want to double the recipe.

Bring 2 quarts of water to a boil in a 3 quart saucepan. Add Tubetti with one tablespoon kosher salt and cook as directed on the package.

Add broccoli to the pasta for the last 30 seconds of cooking. Remove from heat and drain in a colander.  Rinse well with cold water to stop the broccoli from cooking.

To a large mixing bowl, add your dressing ingredients and whisk vigorously. Pour the cooked pasta and vegetables over the prepared dressing and toss well to combine. Adjust seasonings as desired. Cover and refrigerate for at least an hour before serving.

Note: Fox Point Seasoning is a mixture of salt, dried shallots, chives, garlic onion and green peppercorns that adds delightful flavor to vegetables, poultry, fish and salads. If you don’t have a Penzeys store near you, you can find it at penzeys.com