Brownie Bottom Cheesecake with Chocolate Ganache and Raspberry Sauce

Brownie Bottom Cheesecake

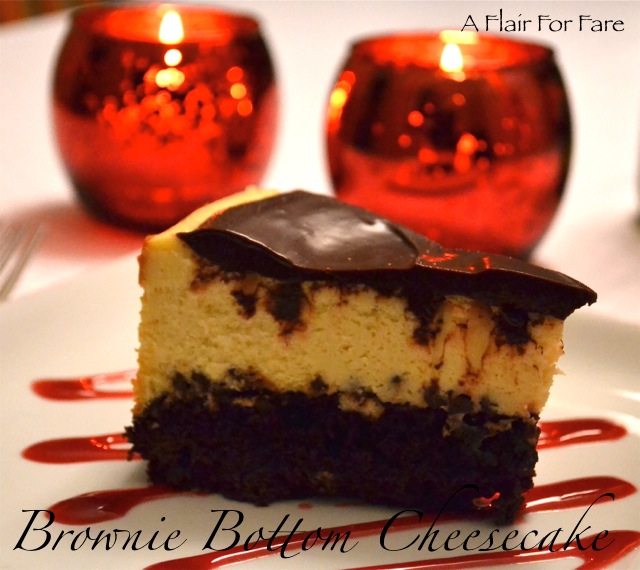
If you’re looking for a seriously sexy dessert for Valentine’s Day, this is it. This irresistible threesome of fudge brownie, cheesecake and raspberry sauce will be the perfect ending to the sweetest day of the year.

Brownie Bottom Cheesecake with Chocolate Ganache and Raspberry Sauce

(adapted from Eagle Brand)

Ingredients

No-Stick Cooking Spray
1 package Ghirardelli Triple Fudge Brownie Mix (or your favorite chewy fudge brownie mix- but be sure it is large enough for a 9×9 pan)
3 (8 oz.) packages. cream cheese, softened
1 (14 oz.) can Eagle Brand® Sweetened Condensed Milk
3 large eggs at room temperature
2 teaspoons pure vanilla extract
1/2 cup mini chocolate chips

Directions

Heat oven to 350°F. Spray bottom only of 9-inch springform pan with no-stick cooking spray. Prepare brownie according to package directions. Spread evenly in prepared pan.

Bake 30 minutes or until set. (Do not bake the full time as directed on the brownie package)

Beat cream cheese until fluffy in large bowl. Gradually beat in sweetened condensed milk. Add eggs and vanilla; mix well. Stir in chocolate chips. Pour over brownie in pan.

TIP: To prevent the chocolate chips from falling to the bottom of the cream cheese filling, toss chips in flour to coat.

Reduce oven temperature to 300°F. Bake 50 minutes or until set. Cool. Chill thoroughly. Remove side of springform pan. Top with chocolate ganache and serve with raspberry sauce. Yield: 12 to 16 servings.

For the Ganache
6 ounces Ghirardelli bittersweet chocolate, chopped
1/2 cup heavy cream
1 tablespoon unsalted butter
2 teaspoons pure vanilla extract

Heat chocolate and cream in a glass bowl over a pot of simmering, but not boiling water until smooth Add butter and vanilla, cool slightly, 10-15 minutes, whipping with a hand whisk to keep smooth. Spread on top of chilled cheesecake and continue chilling. Note: do not let ganache cool for too long or it will be too thick. Be sure cheesecake has chilled before adding the ganache.

Raspberry Sauce- makes 2 cups

Ingredients
1 half-pint package fresh raspberries
1/3 cup granulated sugar
1/4 cup water
1 cup (12 ounces) seedless raspberry jam

Directions
Place the package of raspberries, the granulated sugar, and 1/4 cup water in a small saucepan. Bring to a boil, lower the heat, and simmer for 4 minutes. Pour the cooked raspberries into a strainer over a bowl or measuring cup and strain out the seeds, Pour the strained juice and jam into the bowl of a food processor fitted with the steel blade or a blender and process until smooth. Chill.

Linzer Cookies

Linzer cookies 2

You won’t find a more tender, melt in your mouth confection than the Linzer. So delicate and sweet, I especially enjoy making these buttery little beauties for Valentine’s Day.

Linzer Cookies

Ingredients (makes 10-12 cookies)

1 cup Butter

2 cups sifted Cake Flour

1 teaspoon orange extract or orange liqueur

1/2 cup powdered sugar

Raspberry, strawberry or cherry jam

Linzer cookie cutters

Directions

In a large mixing bowl, mix butter, orange extract and sugar.  Add in 1 cup of flour at a time, mixing well. Remove dough from mixing bowl, shape into a ball and wrap in plastic wrap. Chill the dough at least 2 hours.

Roll out 1/2 of the dough on a floured board to 1/4 inch thick. Cut out the bottom cookie using the linzer cutter without the insert. Roll out the remaining  dough and cut the cookie tops with the Linzer cutter with insert.

Bake cookies for 12 minutes. Cool completely. Generously dust tops with powdered sugar. Spread about 2 teaspoons jam on each cookie bottom. Place cookie tops over bottom cookies to create a sandwich cookie. Store in a single layer in covered container.

If you don’t have a linzer cookie cutter you could use a 2 inch fluted cookie cutter and a 3/4 inch cookie cutter to cut out the center of the top cookie.

Linzer 2

Cheesy Cauliflower Chowder

Cauliflower Chowder

If you’re looking for a low carb alternative to potato soup, this may be it.  Full of healthy vegetables, I added cheese, half and half, cayenne and my favorite vegetable seasoning to the original recipe for added creaminess and flavor.

Cheesy Cauliflower Chowder

adapted from Damn Delicious

2 tablespoons unsalted butter
2 cloves garlic, minced
1 small onion, diced
2 medium carrots, peeled and diced
2 medium stalks celery, diced
1/4 cup all-purpose flour
4 cups low sodium chicken broth
1 cup low fat half and half
1 medium sized head cauliflower, roughly chopped
1 bay leaf
Kosher salt and freshly ground black pepper, to your taste
1/4 teaspoon cayenne pepper
2 tablespoons chopped fresh parsley leaves
1/2 cup sharp grated cheese
1/2 teaspoon Penzey’s Fox Point Seasoning (optional)

Saute garlic, onion, carrots and celery in melted butter in a large soup pot over medium heat until tender. Add chopped cauliflower and bay leaf. Continue to sauté for about 3 minutes, until cauliflower is at the al dente stage. Do not overcook or cauliflower will be mushy.

Add in flour and stir in for about 1 minute, until flour is cooked. Add half and half and broth and stir until slightly thickened. Increase to high heat and bring to a boil. Once boiling, reduce heat to low and simmer until cauliflower is tender, about 10 minutes.  Season with salt and pepper to taste. Because the size of the vegetables will vary, you may want to add additional half and half if soup is too thick.

Fox Point seasoning  is a vegetable seasoning made of salt, dried shallots, chives, garlic, onion and green peppercorns that adds great flavor. Fox Point is available online if you don’t have a Penzey’s store in your area. There are similar seasonings in your grocery store. Experiment with your favorite seasonings to get the results you are looking for.

Add chopped parsley and serve. Makes 6 servings.

https://www.penzeys.com/search/#?q=Fox%20Point

Corn and Potato Chowder

Corn and Potato Chowder

Here’s a  savory stew that’s perfect for these cold winter nights. Made with simple ingredients that you probably have in your pantry, you’ll have a delicious dinner ready in no time.

Corn and Potato Chowder

You will need:

2 tablespoons butter
2 tablespoons all purpose flour
1 cup low fat half & half, warmed in microwave
4 cups low sodium chicken broth, warmed in microwave
1 cup grated sharp cheddar cheese
4 cups diced yukon gold potatoes
2 cups frozen corn
1 small sweet onion diced
2 cloves garlic, minced
1 teaspoon kosher salt
½ teaspoon freshly ground black pepper
¼ teaspoon cayenne pepper
Fresh or dried parsley
6 slices Pork or Turkey bacon, cooked and crumbled

Directions:
Sauté  onion in a large soup pot over medium heat for 4-5 minutes until translucent. Add minced garlic and corn and continue to sauté for 3 additional minutes.

Whisk in flour and cook for 2 minutes, stirring constantly.  Whisk in warmed milk, then add chicken broth, one cup at a time, stirring well after each addition.  Bring heat up to medium-high, then add potatoes. Season with salt, pepper and cayenne. Simmer for 20-25 minutes or until potatoes are tender.

When potatoes are done remove from heat. Stir in cheddar cheese until melted. Spoon into serving bowls and garnish with bacon pieces and parsley, if desired. Serve with cornbread.

Makes 6 servings


Classic Chicken Pot Pie

chicken pot pie 2

Last January I posted a version of this recipe made with puff pastry.  While that has a more impressive presentation, it is a bit more work, so I thought I would re-post the recipe using packaged pie crust. Just un- roll and fill! This makes your life a little easier, and the outcome is every bit as delicious.

Classic Chicken Pot Pie

Ingredients for filling:

1 ½ cups cooked chicken breast cut into cubes

¼ cup butter

1/3 cup flour

1/3 cup chopped onion

1 teaspoon salt

1/3 teaspoon pepper

1 teaspoon Herbs de Provence

1 ½ cups chicken broth

½ cup milk

1 1/2 cups frozen mixed vegetables

1 medium potato, pre-cooked and cubed

1 package Pillsbury Pie Crust

1 egg

Directions:

Start by roasting the chicken. I find this method to produce a more  flavorful, and moist chicken breast than boiling. Take one large chicken breast, (bone in and skin on), place it on a foil lined sheet pan. Brush the chicken with olive oil,  and season with salt and pepper and Herbs de Provence.

Roast in a 350 degree oven for about 45 minutes, until the skin is crisp and lightly browned. Roasting time can vary, use a instant read thermometer if you are unsure.  The chicken should be cooked to an internal temperature of 165 degrees, which is a safe minimum internal cooking temperature according to food safety.gov. You can also use leftovers from a rotisserie chicken.

Let the chicken rest until cool enough to handle. Remove skin and shred or cut into bite size pieces.

Cook the potato. You can bake in the oven or microwave just until tender, but still firm. Cool and dice.

Preheat the oven to 425 degrees. Remove prepared pic crust from refrigerator.

In a medium saucepan, melt the butter over medium heat. Add onion; cook until tender, about 2 minutes. Stir in flour, salt and pepper. Cook stirring constantly for about 3 minutes until the flour mixture is bubbly.

Stir in the broth and milk. Heat until bubbly, stirring constantly. Stir in chicken and vegetables until heated through.

Make an egg wash.  Crack one egg into a bowl and add a teaspoon of water. Beat egg and water.

Carefully un-roll one of the pie crusts. Place in a 9 inch pie plate.

Spoon the prepared filling into the crust. Un-roll the second crust and carefully place the second crust on top and flute the edge. Cut 4 slits in the top. Brush the crust with the egg wash. Place pie plate on a sheet pan and move to pre heated oven.

chicken pot pie fillingchicken pot pie crust

Bake for 35 to 40 minutes at 425 until crust is golden brown. Check after 20 minutes. If browning quickly,  place a sheet of foil loosely over the pie and continue to bake. This will prevent over-browning. Remove from oven and let rest for 10 minutes before cutting.

chicken pot pie 1

Rocky Road Fudge

Rocky Road Fudge

Every Christmas I make a batch or two of that reliable old favorite Never Fail Fudge recipe. I can’t imagine how many pounds of this sweet concoction I have given away. It’s so easy and comes out perfect every time. This year I decided to make it a little more interesting, adding mini marshmallows and a mixture of my favorite nut variety to create my version of this popular holiday treat.

Rocky Road Fudge

2 1/2 cups sugar

1/4 cup butter

1- 5 ounce can evaporated milk

1- 7 ounce jar marshmallow fluff

3/4 teaspoon salt

3/4 teaspoon vanilla

1- 12 ounce package semi-sweet chocolate chips

1- 1/2 cups chopped toasted nuts (I used a mixture of pecans, cashews, almonds and pistachios)

2 cups mini marshmallows

Line an 11 x 7  baking dish with aluminum foil, extending foil over the edges of the dish. Lightly butter foil and set aside.

In a medium (3 Quart) heavy bottomed sauce pan, combine sugar, butter, evaporated milk, marshmallow fluff and salt. Stir over low heat until blended.

Bring mixture to a low boil over medium high heat, stirring constantly for 5 minutes.

Remove saucepan from heat, add vanilla and chocolate chips. Stir until smooth. Stir in nuts and mini marshmallows. Quickly pour into prepared dish, spread evenly and cool. When fudge has set, lift out of baking dish and cut into squares.


Peanut Butter Blossoms

Peanut Butter Blossoms

We can’t let this holiday go by without baking a batch of this Christmas classic. This is such a simple recipe, you’ll have them done in no time.

Peanut Butter Blossoms

(adapted from Betty Crocker recipe)

You will need:
1 (14 oz.) can sweetened condensed milk
3/4 cup creamy peanut butter
2 cups Bisquick biscuit mix
1 teaspoon vanilla extract
1/3 cup sugar
36 Hershey’s Kisses (Milk Chocolate or Dark Chocolate)

Pre-heat oven to 375°F.
Beat sweetened condensed milk and peanut butter in large bowl until smooth.
Add biscuit mix and vanilla; mix well.
Roll into 1 1/4 inch balls. Roll in sugar. Place 2 inches apart on ungreased baking sheets.
Bake until lightly browned on bottom, about 6 to 8 minutes. Be careful not to over bake.
Remove from oven, press a chocolate kiss into center of each cookie.
Transfer to a wire rack to cool.

Recipe makes 3 dozen cookies.

Turtle Thumbprints

Turtle Thumbprints

This is a fabulously rich, chocolate brownie cookie, rolled in pecans, filled with caramel and drizzled with chocolate.  Now if that doesn’t peak your interest, I don’t know what will.  Chewy, gooey, crunchy and oh my goodness,  so delicious.

Turtle Thumbprints

(adapted from Tastes Better from Scratch, The Kitchen is my Playground, America’s Test Kitchen)

Cookie ingredients:

2 cups all purpose flour

2/3 cup cocoa powder

1/2 teaspoon salt

1 cup (two sticks) butter

1 and 1/3 cup sugar

2 large eggs, separated

4 tablespoons milk

2 teaspoons vanilla

2 cups pecans, finely chopped

Caramel Filling:

1 bag Kraft Caramel bits

1 teaspoon water

Drizzle:

3/4 cup chocolate chips plus 1 teaspoon shortening

Directions:

Sift flour, cocoa and salt into a large bowl; set aside. Using a heavy duty mixer, cream butter and sugar. Add egg yolks one at a time; mix in milk and vanilla.  Slowly add flour/cocoa in four parts, mixing just until combined. Chill at least one hour in an airtight container. Dough can be made in advance and chilled for several days. You will need to bring it back to room temperature so that it is soft enough to work with.

Prepare baking pans. Line with silpat or parchment paper. Preheat the oven to 350 degrees.

Roll the dough into small balls, whatever size you prefer. I used a cookie scoop 1 and 1/2 inch wide and 1 inch deep, which made 38 cookies.

In a small bowl, whisk egg whites until frothy. Add chopped pecans to a shallow bowl. Roll dough balls in egg whites, then roll in chopped pecans, pressing nuts into dough. Use your thumb or a small spoon (a 1/2 teaspoon measuring spoon works well) to make a small well in the center of each cookie ball. Refrigerate cookies on cookie sheet for 10 minutes then bake for 12 minutes, just until set. Remove from oven and re-press center. Cookies will appear under cooked, but will firm up when cooled. Do not over bake. Cool on cookie sheet for 5 minutes, then move to wire rack to finish cooling.

In microwave safe bowl or measuring cup, microwave caramel bits and water in 30 second intervals until melted and smooth. (I separated into 2 batches) Carefully fill center of cookie with caramel. When caramel has set, drizzle with chocolate.

For chocolate drizzle, microwave chips and shortening in thirty second intervals until melted. Stir until smooth. Use a decorating squeeze bottle or fill a plastic sandwich bag and snip the corner, squeezing to drizzle chocolate over cookies.  Let chocolate set before storing in an airtight container.

Turtle cookies 3

Gingerbread Men

Gingerbread Men 2

It just wouldn’t be Christmas without these little guys marching out of my oven. Friends and family look forward to receiving these cookies from me year after year. This recipe produces a chewy cookie. Decorate with Royal Icing or your favorite frosting.

Gingerbread Men

Makes 24  3 1/2 inch gingerbread men.

You will need:

2/3 cup shortening

1/2 cup brown sugar, packed

1 teaspoon cinnamon

1/4 teaspoon ground cloves

2 teaspoons ground ginger

1/4 teaspoon salt

3/4 cup molasses

1 egg

3 cups flour

1/2 teaspoon baking powder

1 teaspoon baking soda

Directions:

Using a heavy duty mixer, combine first 6 ingredients.  Add egg and mix.  Add molasses and continue to mix until creamy.

Add together flour, baking powder and baking soda in a separate bowl.  Sift.  Slowly add flour mixture to the wet mixture and mix until well blended.  Remove from mixing bowl and divide dough into 2 discs. Cover in plastic wrap and chill at least 1 hour. If dough is too sticky, put in freezer for about 20 minutes before rolling it out. It is important to keep the dough cold.

Preheat oven to 375 F.  Roll out 1/4 of the dough at a time to 1/8″ thickness or slightly thicker between 2 pieces of plastic wrap or wax paper.   Cut out shapes with a cookie cutter and transfer to a parchment or silpat lined cookie sheet. Bake for 8 minutes.

Leave in pan for 5 minutes then move to a wire rack to cool. Decorate when completely cooled.


Sloppy Joes

Sloppy Joe

This family favorite comes together quickly for an easy weeknight meal. The perfect choice for feeding a crowd; just double or triple the recipe. Save time by making ahead and freezing for later. I like to give this sweet and tangy sauce a little kick by adding Chipotle pepper sauce.

Sloppy Joes

Adapted from Williams-Sonoma Kitchens

Ingredients:

  • 1 Tbs. canola oil
  • 1 yellow or sweet onion, diced
  • 1 celery stalk, diced
  • 1/4 cup finely diced green bell pepper
  • 1 1/2 lb. ground sirloin
  • 1 cup tomato sauce
  • 1/2 cup ketchup-style chili sauce
  • 1 Tbs. Worcestershire sauce
  • 1 Tbs. Dijon mustard
  • 1 Tbs. cider vinegar
  • 1 Tbs. firmly packed light brown sugar
  • 1 tsp. kosher salt
  • 1/4 tsp. freshly ground pepper
  • Tabasco Chipotle Pepper Sauce to your taste (optional)
  • 6 sesame-seed sandwich buns, split

Add onion, celery, green pepper and canola oil to a large skillet or sauté pan. Cook over medium heat for about 5 minutes, until the onions are soft. Increase the heat to medium high and add the ground sirloin. Break up the beef and cook until no longer pink. Remove any fat from the pan. Stir in remaining ingredients and simmer over medium-low heat, stirring often for about 20 minutes.

Serve over toasted sesame-seed buns with zesty sweet pickles, if desired. Serves 6.

Classic Pecan Pie

Pecan pie 1

This recipe that I am about to share with you is very special.  Not because it is one of a kind, or has amazing, unusual ingredients. You can probably find tons of pecan pie recipes that are very similar featured in any cook book or magazine.  This is a simple, classic pecan pie recipe. What makes it special are the memories that are tied to it. Memories of a big sister who was like a mother to me. A big sister that I lost to cancer. My oldest sister Bonnie.  Bonnie’s life was about faith and family. She gave much to many, and we miss her terribly.

I remember the day she wrote out the recipe and handed it to me. I was home for Christmas, down in Alabama with my 10 year old son Bryant. This was the first time Bryant had tasted Bonnie’s pecan pie, and he asked her to give me the recipe. That was 22 years ago, and I still have that recipe card.  I never imagined that 4x 5 recipe card would become such a valued treasure.

So now every Thanksgiving and Christmas, I will pull out that card, see her hand writing and many wonderful memories come to mind.  And though I am still saddened by her passing, I am so happy and thankful to have had her for a big sister and all of the memories she left with me, and for this recipe that I can share and create new memories with my son and his children.  Amazing, isn’t it, how special a pecan pie can be.

Brenda and Bonnie

Happy days with my sister Bonnie.

Classic Pecan Pie

1/2 cup sugar

1/4 cup butter, melted

4 eggs

1 1/2-2 cups pecan halves

1 cup light corn syrup

1 teaspoon vanilla

1/8 teaspoon salt

Pie pastry for one nine inch pie plate plus additional for pastry leaves.

Preheat oven to 350 degrees.

Line a 9 inch glass pie plate with a pastry shell. Using a pie pastry leaf cutter, cut out enough leaves to cover the pastry edge of the pie plate. In a small bowl, beat one egg with 1 teaspoon water or milk.   Brush edge of pie shell with egg wash and line with pastry leaves. Brush tops of leaves as well.  Refrigerate while you prepare filling.

Combine sugar, corn syrup, vanilla, melted butter and salt. Beat 3 eggs and add to sugar mixture and whisk to combine. Rough chop one cup of the pecans and stir in. Pour filling into prepared pie shell and top with remaining pecan halves in a circular pattern.

pecan pie leaves

Place pie plate on a rimmed cookie sheet and put into oven on center rack. Bake 55-60 minutes until center is set. If edges begin to brown excessively, place a sheet of foil loosely over pie to shield.

Cool completely before serving.

pecan pie whole

Chocolate Silk Pie

Chocolate Silk Pie

This is a recipe I ripped out of a Better Homes and Gardens magazine almost 20 years ago. I’ve made it year after year, during the holidays or any occasion I wanted an especially impressive dessert to serve and it never disappoints. If you want to walk away with rave reviews, you’ll want to give this sweet treat a try. Creamy, dreamy, silky chocolate pie. Not a pudding pie, mind you. This is french silk. Thick, rich, decadent. Topped with freshly made whipped cream, it’s all you’ve ever wanted, and more.

Chocolate Silk Pie

(adapted from Better Homes and Gardens Magazine, November, 1995)

1 cup heavy whipping cream

1 – 6 ounce package semi-sweet chocolate chips

1/3 cup butter

1/3 cup sugar

2 egg yolks

3 tablespoons Godiva chocolate liqueur

1- 8 or 9 inch pastry pie shell

Additional whipping cream for topping

Prepare your pie crust. Bake and set aside to cool.

Add 1 cup heavy whipping cream, chocolate chips, sugar and butter to a heavy bottomed 2 quart saucepan over  low heat. Cook, stirring constantly until chocolate is melted and all ingredients are combined.

In a small bowl, beat egg yolks. Remove saucepan from heat. Add about 1/4 cup of the chocolate mixture to the beaten eggs to temper* (see note). Return egg mixture to saucepan over medium low heat. Bring to a low simmer, stirring constantly. Mixture with thicken slightly and start to bubble, 3 to 5 minutes.

Remove saucepan from heat and stir in the chocolate liqueur. If you prefer not to use liqueur, stir in an additional 3 tablespoons of heavy whipping cream.

Prepare a large bowl of ice and cold water large enough to hold the saucepan. Place saucepan in ice water, adding additional ice as needed. Stir occasionally as mixture cools and stiffens. This will take about 20 minutes. Remove saucepan from ice water and beat on high speed with an electric hand mixer for 2-3 minutes. Filling will become light and fluffy.

Spread filling evenly in pie shell, cover and chill at least 5 hours or overnight. Decorate with freshly whipped cream and mini chocolate chips and chill for another hour before serving.

Chocolate Silk Pie slice

For the whipped cream topping:

Pour 1 cup chilled heavy whipping cream to the bowl of an electric mixer fitted with a whisk attachment. (for best results, chill the bowl and the beater before using). Add 1 tablespoon sugar. Start on low and gradually increase speed to medium high. (8 on a KitchenAid stand mixer) The cream will start to thicken and soft peaks will form. Continue until the cream stands in stiff, sharp peaks. This only takes a few minutes; watch the cream closely and do not over whip or you might end up with butter.  Add whipped cream to a piping bag with decorative tip and pipe decorative swirls onto the pie as you wish. I used a large Wilton tip. If you don’t want to pipe the cream and prefer just to cover the top of the pie with it, increase the amount of cream to 1 and 1/2 cups and add another tablespoon of sugar. For best results, do not use ultra-pasteurized whipping cream.

*About tempering: You need to bring the eggs up to a high temperature without cooking them. Take your hot chocolate mixture and add a small amount into the beaten eggs and whisk. Slowly adding the hot mixture to the eggs prevents the eggs from being scrambled.

S’more Pops

Smore Pops

Here’s a quick and easy fun treat, just in time for Halloween!

S’more Pops

For one dozen pops you will need:

  • 12 regular sized marshmallows
  • 1/2 cup semi sweet, dark or milk chocolate chips
  • 2 teaspoons canola or vegetable oil
  • 5 sheets of graham crackers, finely crushed
  • 12 lollipop sticks

Line a cookie sheet with wax paper or parchment.

Add chocolate chips and oil to a small microwaveable bowl or coffee mug. Melt in the microwave at 30 second intervals until mixture is smooth.

Insert lollipop stick into marshmallows. Dip marshmallows in melted chocolate letting excess chocolate drip off.

Quickly dip marshmallows in crushed graham crackers and place on lined cookie sheet.

Place cookie sheet in refrigerator for 15-30 minutes, until chocolate has set.

Roasted Tomato Soup with Three Cheese & Prosciutto Panini

Roasted Tomato Soup with 3 Cheese & Proscuitto Panini

It’s late October and lucky for me I still have tomatoes on the vine in my garden. These late red beauties have perfect timing. Cool autumn weather has arrived and I have a craving for spicy tomato soup and a thick gooey grilled cheese sandwich. This roasted tomato soup recipe from 12 tomatoes is super easy and has a delicious smokey flavor. Pair it up with my Three Cheese & Prosciutto Panini and you’ve got a dynamic duo.

Roasted Tomato Soup

adapted from 12 Tomatoes

Ingredients

  • 5 large tomatoes, cut into 3/4″ slices
  • 1 onion, cut into 1/2″ slices
  • 1/2 jalapeno, cut in half lengthwise, seeded
  • 2 bell peppers, seeded, cut into 4 pieces
  • 2 cloves garlic
  • olive oil
  • 1/4 teaspoon smoked paprika (or chipotle sauce, see note)
  • 1/2 teaspoon dried basil
  • 3/4 teaspoon salt
  • black pepper to taste
  • 2 cups vegetable broth
  • 1/4 cup grated parmesan cheese
  • a few tablespoons heavy cream or creme fraiche

Directions

Preheat oven to 375 degrees.

Spread vegetables on a large rimmed baking sheet. Drizzle with olive oil and toss to coat well. Roast until tender, 20-25 minutes.

roasted tomato soup 1

Put roasted vegetables into a Vitamix or blender with paprika, basil, salt, pepper,  vegetable broth and cream. Blend to a smooth puree.  Pour into soup pot and simmer over low heat 10 -15 minutes.  Add additional seasonings as desired.

Serve with freshly grated parmesan cheese and croutons.  Makes 4 servings.

Note: if you can’t find smoked paprika, you can use a chipotle or adobo sauce instead. Start with 1 teaspoon and add more according to your taste.

Three Cheese & Prosciutto Panini

Country Italian Bread

Sun-dried Tomato Pesto

Thinly sliced prosciutto

Sliced or shredded Mozzarella Cheese

Sliced Monterey Jack Cheese

Freshly grated parmesan

Slice bread for sandwiches. Spread pesto on insides of both slices. Layer jack cheese, prosciutto, mozzarella and  parmesan on one slice of bread. Top with 2nd slice. Butter top of bread and place butter side down on panini press. Butter top side of sandwich. Press lid tightly and grill until bread is toasted and cheese has melted.


Pumpkin Spice Cupcakes

Pumpkin Spice Cupcakes

This is an easy semi-homemade recipe that starts with a spice cake mix. Full of pumpkin flavor that screams fall, these cupcakes will be  ideal for your Halloween party or any fall get-together. The sweet cream cheese frosting is the perfect accompaniment to these spicy little cakes.


Pumpkin Spice Cupcakes

adapted from My Baking Addiction

For the cupcakes you will need:

1 box spice cake mix (15-18.25 ounces)

1 3.4 ounce package instant vanilla pudding mix

1 teaspoon pumpkin pie spice

1/2 cup sour cream

1 cup pure pumpkin puree

1/2 cup vegetable oil

3 eggs

2 teaspoons vanilla extract

For the frosting you will need:

2 8 ounce packages cream cheese, softened

1/2 cup unsalted butter, softened

1 1/2 pounds (5 3/4 cups) confectioner’s sugar

1 teaspoon vanilla extract

Preheat oven to 350 degrees.

Prepare two 12 cup muffin tins with either paper liners or non stick cooking spray.

Beat eggs in a large mixing bowl using an electric mixer. Add remaining ingredients and mix on medium speed until smooth.

Distribute batter evenly among muffin cups, 1/2 to 3/4 cups full.

Bake for 18-22 minutes. Test for doneness using a toothpick.

Leave cupcakes in baking pan for 10 minutes before transferring to a wire rack. Cool completely.

Prepare Frosting.

A stand mixer works best, but you can use a hand mixer. Beat softened cream cheese on medium high speed until smooth and creamy. Add butter and beat for 3 minutes more. Slowly add in confectioners sugar and beat on low until fully mixed in. Add vanilla and beat for another 3-4 minutes. Frosting should have a light and fluffy consistency.

Frost cupcakes generously when cooled completely. Decorate as you desire.